 In this post, chiptune guru Joe E. Allen makes his long-awaited return, with a look at making music on a Game Boy with LSDj.
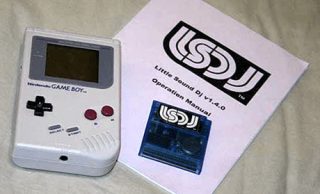
LSDj (Little Sound Dj) is a sequencing app that lets you make 4-track music, using the Game Boy sound chip.
The app is available (used) on cartridges or as a ROM file. The ROM can be used with free Game Boy emulators and or loaded to a Game Boy backup device to be used with your hardware Game Boy.
In this article, Allen & fellow chiptune musician HarleyLikesMusic take an in-depth look at how to get started with LSDj….
Last year I wrote a post on how to make authentic 8-bit music that could be played on a Nintendo Entertainment System. I’ve finally got around to writing another post, this time with the help of UK chiptune musician, HarleyLikesMusic.
 In this article, we’re going to be looking at LSDj, a tracker program for the Nintendo Game Boy.
Little Sound Dj (aka LSDj) was first released by Johan Kotlinski in the year 2000, and since then it’s been frequently updated with more and more improvements to the point where it is now probably the most popular method of writing chiptune.
Official LSDj cartridges have been out of production for a long time, so the most popular way of doing things these days is to buy a blank Game Boy cartridge and flash the ROM onto it yourself.
You might be able to find a pre-flashed cart for sale online, but where’s the fun in that? Plus you would end up paying more than if you did it yourself… There’s information to be found on all this at the LittleSoundDj site.
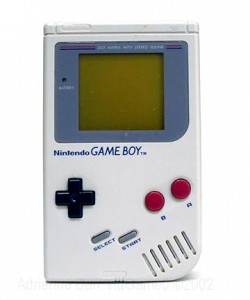
As you might remember from your gaming days, there were plenty of different versions of Nintendo’s Game Boy released over the years. You can use LSDj on any of these, but generally the original grey model released at the end of the 80s is considered the best for making music, as its sound is nice and bassy. Plus, it has the longest battery life. (This version is often called a DMG, in chip circles, because of its model number).
These old Game Boys have an 8-bit CPU inside called a Sharp LR35902 and this provides four audio channels that produce 4-bit sound. This is how your favorite Game Boy games were soundtracked!
Here’s a classic example, by Hirokazu Tanaka, from one of the most popular Game Boy games of all time, Super Mario Land:
And who remembers the hit single by Ambassadors of Funk that sampled that game’s soundtrack?
https://www.youtube.com/watch?v=ujaqy4cOTew
 Anyway, we’re getting distracted! It’s now time to take a look at how we can make chiptune on a Game Boy with HarleyLikesMusic.
Here’s Harley…..
Welcome! My name is Harley, I create chiptune/micromusic and have been playing gigs in this way around the world for over seven years.
For this short introduction tutorial, you are going to need either a Game Boy running LSDj or a Game Boy emulator running it.
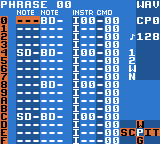
When you first load up the program, your screen should look like this:
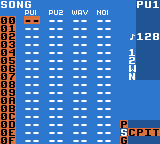 Use the directional pad to move around this screen.
As LSDj is a tracker, the music starts at the top and scrolls downwards through the numbers on the left hand side.
Across the top you will see ‘PU1’, ‘PU2’, ‘WAV’ and ‘NOI’, and these represent the 4 audio channels on the Game Boy.
- The first 2 channels are ‘Pulse 1’ and ‘Pulse 2’, which each produce a square-shaped wave form:
- ‘WAV’ stands for ‘wave’ and can be used to create your own waveforms or play back samples,; and
- ‘NOI’ produces noise.
In the bottom right corner you will see a grid with the letters ‘SCPIT’. If you hold down the SELECT button and then press RIGHT on the D-pad you will notice the screen will change and instead of ‘S’ being highlighted it is now ‘C’ – this is how you navigate through the screens.
Making Sounds With LSDj
Now let’s start making some sounds.
Hold SELECT and press LEFT to go back to the ‘S’ screen which stands for song, then let go of SELECT and move the cursor over to the first row (00) in the WAV channel. Press A and this will start a new chain. While still hovering over the new chain you have made, hold down SELECT again and press RIGHT – this will take you into the chain you have just created. Tap A again on the first row of the chain and this will make a new phrase. Hold down SELECT once again and press RIGHT – now we are inside the phrase. Tap A in the first row of the phrase and the note C2 will appear.
To understand what we just did, think of LSDj like a city, the note C2 being a brick, the phrase being a wall, the chain being a building and the song screen where we started being the city where we put all our buildings together. A phrase is made up of notes, a chain is made up of phrases and the song screen is where we put all our chains together to make a song.
Before we can create sounds we need to first create an instrument. You’ve probably guessed by now that in the phrase screen ‘INSTR’ stands for instrument.
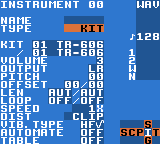 Currently, the note we have placed (C2) doesn’t have an instrument assigned to it, so move your cursor to the right so it is in the instrument column next to C2, tap A and it will create a new instrument. Hold down SELECT and press RIGHT and you will be taken into the instrument we have just created.
Building A Percussion Track
So that we have a bit of a backing track to write some music, let’s start with some percussion.
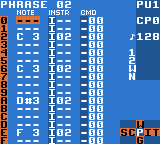
Go down to the ‘type’ section, hold down A on the word ‘pulse’ and press RIGHT till you find ‘kit’. This will turn our instrument into a kit instrument which allows us to use samples. You can choose which sets of samples you want to use by moving the cursor over the ‘kit’ boxes. Hold down A and press LEFT/RIGHT to change the sample sets (currently both are set to ’01-TR606′). Let’s just stick with the TR-606 samples for now, so hold down SELECT once again and press LEFT to go back to the phrase screen.
You’ll notice the phrase screen has changed a little – there are now 2 columns and instead of C2 being in one of the columns it says ‘BD’, or bass drum. This is because we have changed the instrument type to ‘kit’. Press the START button and your pattern should start playing. The sound ‘BD’ will play first as that is at the top of the column.
In the same column. press A to insert samples into rows 4, 8 and C. Now you have a 4×4 kick drum loop. If you made a mistake by putting a sound in the wrong row or column, just hold down B over the note you want to remove and press A – the note should be removed. Press START again and LSDj will stop playing.
 Now move over to the other column and go to row 4. Hold down the A button, but before letting go press right and the ‘BD’ will change to ‘SD’, or snare drum. Holding down the A button above a note or sample and then pressing directional buttons will allow you to change the sound that is played from the kit, or will allow you to change the note being played. Go to row C and add a snare drum (‘SD’) just like you did before. Press START once again and you’ll hear a basic house drum beat. [3]
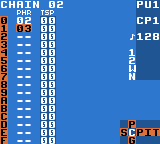
Hold down SELECT and press LEFT until you get back to the song screen, and move your cursor right so the first row in the ‘NOI’ column is highlighted. Hold down the A button and you’ll notice that 00 will appear, but we have already used 00, so whilst still holding A, press RIGHT once and it will change to 01. This means we will start with a blank chain. Hold SELECT and press RIGHT to go into the chain we have just created.
A quicker way of creating a new chain or phrase is to double tap A in a blank space and it will automatically create a new chain or phrase using the next available unused space. Go ahead and double tap A at the top of the column. You should now see 01. Hold down SELECT and press RIGHT to go inside the phrase we have just created.
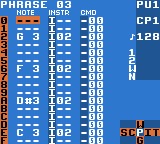
In this channel we are going to use noise to create some hi-hats. Move the cursor down to row 2 and press A and you’ll notice that ‘BD’ will appear again. This is because LSDj will automatically enter the last instrument you have used. You’ll see in the instrument column the instrument value is 00 (the kit instrument we made earlier), so go ahead and delete that 00 (delete by holding B and then pressing A) and then create a new instrument (double tap A). Hold down SELECT and press right to view the new instrument we have just created.
Because we are in the ‘NOI’ channel we want to first go down to ‘type’ and change the value to ‘NOISE’ (hold down A in the type box and use the D-pad to alter the type). Press START and you will hear the noise being played back. Currently it is very loud and goes on forever, but we can change how loud it is played and how long it takes for the sound to fade out using the ‘envelope’ section. Move your cursor down by the side of ‘envelope’ to where it says A8. The first digit, A, corresponds to the starting volume (0 being silent, F being the loudest). If you hold A and press UP/DOWN you can alter the first digit. The second digit, 8, corresponds to finishing volume. 1 – 7 decrease the volume, 0 and 8 keep the volume constant and 9 – F increase the volume over time. This digit can be changed by holding down A and pressing LEFT/RIGHT.
 For a hi-hat sound we want something short and snappy, so go ahead and set the first digit to 4 and the second digit to 1. Now when you press START to play the audio it will sound something like a hi-hat.
Hold down SELECT and press LEFT to go back to the phrase screen. Now tap A on rows 2, 6, A and E. Press play and you will hear our hi-hat being played on every off beat.
Now we have our percussion sorted, go back to the main song screen (navigate by holding SELECT and and moving with the D-pad). We have a chain of audio in more than one channel so if we press START on the song screen both the ‘WAV’ and ‘NOI’ channel will play together – pretty cool!
If you find that only 1 channel is playing then it may be that you are in Live mode. In the left corner you will notice that it will say either ‘SONG’ or ‘LIVE’. Song mode will play every channel at the same time, whereas Live mode will only play the channel your cursor is currently in. While on this screen you can change between Live/Song mode by holding SELECT and pressing LEFT (holding SELECT usually allows you to navigate but since this is the first page it is used to change between Song/Live mode).
Adding A Bass Sound
Stop the music from playing and then move your cursor over to the first row in the ‘Pulse 1’ column (‘PU1’). Create a new chain by double tapping A, then go in to that chain by holding SELECT and pressing RIGHT. Double tap A again to create a new phrase and hold SELECT and hit RIGHT again to go into the phrase. Now in the note column, press A on row 2. Again the instrument that has been assigned to this note may be an instrument that we have already used in another channel, so move the cursor over the instrument number and double tap A so that we create a new instrument. Hold SELECT and press RIGHT to go in to the instrument we have created.
This time we are creating an instrument in the pulse channel so first we want to set the type to pulse. Now, just like we did in the noise channel, we want to change the envelope setting, otherwise our note will be playing forever and probably louder than we want it. Move your cursor over the envelope column and set the envelope to 54 (remember UP/DOWN changes the first digit, LEFT/RIGHT changes the second). Press play and you will hear the sound of the pulse instrument we have created.
Currently it sounds a little bit thin for a bass sound, but we can make it sound fatter by altering the wave shape. Go down to the ‘wave’ setting, hold A and use LEFT/RIGHT to change the shape of the wave. Set it so that the line is in the middle of the image (50/50). You will notice the sound now produces more low bass frequencies than before. [5]
 Go back to the phrase screen (hold SELECT, press LEFT), add another C3 note on row 6, a D#3 on row A and an F3 note on row F (tap A to insert notes, hold A and press a direction to alter the note). Now we have a simple bass line.
But what about linking more than one phrase together?
 Go back to the chain screen (SELECT and LEFT) and double tap A on row 1 so that now there are 2 phrases in the column.
Keep your cursor over the phrase you have just added and move back to the phrase screen (SELECT and RIGHT).
Note: when navigating the menus, you need to have the cursor over the chain/phrase/instrument that you want to view. If your cursor is on phrase 03 and you hold SELECT and RIGHT you will enter phrase 03.
 Now place notes G3 in row 2, F3 in row 6, D#3 in row A and C3 in row E.
Navigate back to the chain screen (SELECT and RIGHT), and when you hit START you will notice that after playing the first pattern the second pattern we have created and added to the chain will play
Now navigate back to the song screen and press START to hear what we have made.
Hopefully this short tutorial has helped you to understand the basics of LSDj. I recommend you use the second pulse channel to try and create a melody for the loop we have created. Also tweak some of the parameters within the instruments we have made.
Back to Joe….
Learning More
By following Harley’s guide. you’ll get familiar with LSDj and get a start on making your own songs. Once you are comfortable, download and read through the LSDj user guide to learn more.
Here’s an example of what’s possible, live, with a Game Boy and LSDj live – Harley performing with a Game Boy Advance SP:
As we mentioned at the top of the article, LSDj has almost become the default software for making chiptune. There are too many great artists to mention, but check out the work of Bit Shifter, Comptroller & arcadecoma., below, for examples of what is possible.
Happy tracking!
Bit Shifter’s March Of The Nucleotides
Comptroller’s Crack Pinocchio:
arcadecoma.’s I Haven’t Left The House For Days:
Resources:
- LSDj site
- Original Game Boy Grey on Amazon
- Information on how to put the program on a cartridge can be found here
About The Author:
Joe E. Allen is a music journalist and founder of netlabel, Pterodactyl Squad. All the music on his label is made using video game sound chips or inspired by the sounds of games from years gone by, and it’s all free. Find them online at:
Allen previously authored How To Make 8-Bit Music: An Introduction To FamiTracker and An Interview with chiptune composer Alex Mauer.

Great post
Solid article. Bookmarked for reference!
Impressive what is possible on an old toy!
Awesome post. Nice to see Harley getting a plug on Synthtopia 😀 His stuff has always impressed.
Correction:
“You can use LSDj on any of these, but generally the original grey model released at the end of the 90s is considered the best for making music”
You mean end of the 80’s. 😉
does advance Sp work good??