 In this post, guest author and chiptune guru Joe E. Allen takes a look at making music with the Game Boy Advance using nanoloop 2.
Last year, HarleyLikesMusic and myself wrote a short guide to LSDj. LSDj is a very popular piece of software for making chiptune music on the original Game Boy.
This time, around we’re getting a little more…advanced, with nanoloop 2 (nl2) for the Game Boy Advance. And I’ve enlisted the help of chiptuner James York, aka Cheapshot.
nl2 isn’t as popular as LSDj in the chiptune community, but, for that reason, the artists who use it sometimes stand out a little more. The sounds it makes are more rounded, modern and less harsh and it lends itself to actual live performance more than LSDj, as we will see later on.
Olivier Wittchow created nanoloop 1, nanoloop 2’s predecessor, back in 1998 as part of his degree at the University of Fine Arts of Hamburg. It was a similar, more primitive version of the software for use on the original Game Boy (aka DMG). It was made publicly available for the first time in 2000 on Game Boy cartridges.
As of 2017, both cartridges are still in production, and you can buy them from the official nanoloop site. Updates for nanoloop come out infrequently, and this requires users to flash the firmware on their carts via a special USB adapter that connects to the GBA link cable.
 Unlike LSDj, nanoloop 2 is proprietary and resides on the flashcarts only, not as an external ROM, and so it cannot be emulated on desktop devices. There is a version available for iOS, though.
Wittchow notes:
“When I started developing nanoloop 2, I first tried to put in as much functionality as possible. Version 2.0 had 8 channels and added channel-wide instrument settings. It was a ‘complex beast’, as someone wrote on the forum. It took me a while to realize that the strength of nanoloop lies within its simplicity, the flat structure and that more functions would not necessarily improve it. Instead, the GBA’s advanced possibilities, like more memory, CPU power and extra buttons, could be used to streamline nanoloop further.
So as of version 2.2, nanoloop’s interface was radically simplified. It now has only 4 channels but one of them is 4-voice polyphonic. Still very limited, with a distinct 8-bit character, but with a much greater variety and dynamics range than the original Game Boys.
The GBA’s sound includes the original Game Boy sound chip and stereo digital audio with a resolution of 8bit @ 32 khz. nanoloop 2 only uses the digital audio output, generating FM and filtered square waves/noise in software.
nanoloop has not been designed around old video game nostalgia or tracker music. With its rhythm-centric stepsequencer, it relates to classic techno/house machines like 303 and 808 rather than sheet music. Like the Korg Volca series for example, it puts the loop in the center and offers a variety of functions to modify it real-time and break up the repetetive 16-step structure.”
So What Does nanoloop 2 Sound Like?
Here’s an example:
The UK’s Henry Homesweet, has to be one of the earliest pioneers and all round figureheads for nl2.
His initial video series, Low-bit Basement is definitely worth checking out, as they introduce the nl1 sound and act as a precursor to his later series, Out-House, where nl2 features more prominently.
One of the last Out-House videos (above) really showcases the squelchy FM flavor that can be achieved with nl2.
In a similar vein to Henry Homesweet, we have the magnificent Je Deviens DJ en 3 Jours from France, above, who has been tearing up dance floors all over the world with his nl2 techno jams.
Well wouldn’t you know it – it turns out that Henry Homesweet and JDDJ3J have been working together on a project over the last few years, called CYMBA, that brings the best of their work together, but pushes it into the next generation of what can be achieved with nl2.
Their live set up, as shown above, sees between five and six GBAs synced together, with a slew of other analogue and digital hardware, to bring the very best in nl2-based techno.
little-scale from Australia is a pioneer for chipmusic in general, so it should come as no surprise that he has played a large part in educating people about nl2. The above video is a final live performance of tracks he made in nl2.3.
Why is it so final? Well, the update to nl2.7 was not backwards compatible with older versions, which meant that instruments and patterns you made for the older versions (in this case 2.3) would not play. Enjoy.
Now, I’ll hand you over to Cheapshot to explain exactly how you can start to make music for nl2.
Hi, my name is James York. I produce music under the moniker Cheapshot, run a chiptune record label out of Tokyo called Cheapbeats and also organize Tokyo’s biggest annual chip event Square Sounds Tokyo.
Here are a few video tutorials that I made, explaining each of the menu items in nl2.
nanoloop 2 Tutorial Part 1:
https://www.youtube.com/watch?v=6Xd8v2tda10&
nanoloop 2 Tutorial Part 2:
https://www.youtube.com/watch?v=F1dU2XXGAp8&
Additionally, little-scale and I did a nanoloop 2 workshop, during Square Sounds Melbourne, last year:
https://www.youtube.com/watch?v=Lr1Tvl824DQ&
I’ll outline the main features of the nanoloop 2 below.
Channels
nanoloop features four channels, two monophonic, one polyphonic and a noise channel:

The two monophonic channels are square waves, where the duty cycle can be changed from 50% all the way down to…I’m not sure actually. The polyphonic channel can handle 4 voices at once, and the noise channel has two modes: GBA (16-bit white noise) and GB (8-bit white noise).
Controls
To control nl2, boy oh boy, there is a lot to explain here, so I will just provide a few basics from the manual:

The Most Important Controls In nanoloop 2
One of the key concepts with nl2 is the save/load pattern function and this is the one that people mess up the most (including myself). So, I’ll add it now, before we even get onto pattern writing.
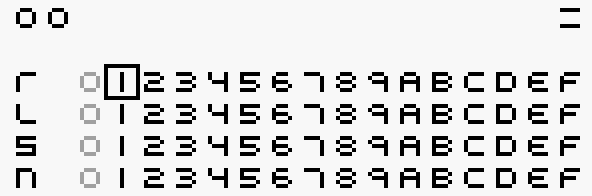
This is the file menu screen. The top left corner shows song number.
As you can see there are a total of 15 patterns that you can save for each channel. (0 is not writable). To write a pattern you’ve made to memory, you have to press B+(down arrow). To save all patterns for the four channels, you have to press A+(down arrow).
Now, to load those patterns, its basically the same but B+(up arrow) for a single pattern, or A+(up arrow) for all patterns in that column.
Now, you are gonna mess this up – go to save that sick pattern you’ve just created and instead load the last pattern you saved instead, or worse, load a completely blank pattern. It happens, just don’t do it again!
Main Menu
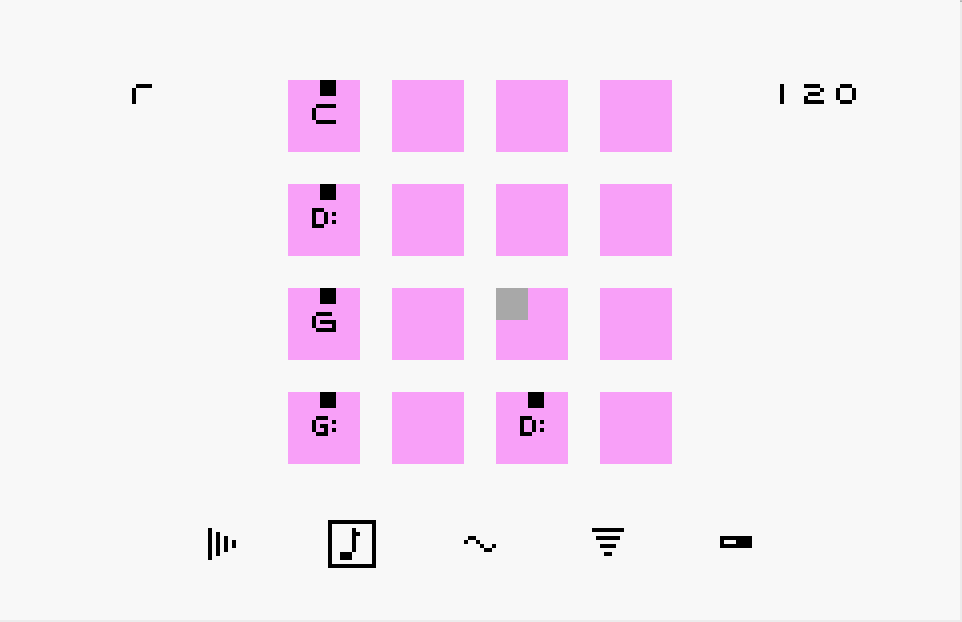
Here is a screen grab of the main menu. From left to right the tools are:
1. Note envelope (volume, length)
2. Note value
3. Filter LFO / pitchbend (depending on channel
4. Filter type and cut-off point
5. Panning/delay
The controls for each menu vary, but as an example, we will look at the first note envelope menu here.
As can be seen in the image above, the pattern plays from top left to bottom right and then loops around again. The far left square on each row is the beat (so a 4/4 time signature (changeable in menu two).
With the note envelope menu selected, and then holding B, we can change the envelope of all notes at once by using the D-pad in the following ways:

For the other menu items such as the Note Value, we can change the value incrementally with the up and down arrows and by octave with left and right arrows.
And the second menu:

Here we have:
1. Return to file menu
2. Sequencer
3. Ping-pong mode (goes back the opposite way when it gets to the bottom right square.)
4. Pattern length
5. Tempo/sync
Ping-pong mode:

Making A Track
So let’s make a track. Starting with a kick drum, then some hi-hats, and finally a little melody.
1. As the device boots up and you can see ‘nanoloop’, press START to get to the delightful 16 pink squares all in a row.
2. Press SELECT to show menu 1. Then, let’s select the note pitch option which is second from the left. Hit B and we are then able to edit each of the 16 squares individually. By pressing B on each square, we can drop in a note. By pressing and holding B on a note, we can then change the pitch. I’m going to use this channel as the kick drum, so I’m going to put the pitch right the way to the lowest note.
This is done with B+(left arrow), as can be seen in the below image.

3. We can alter the pitch bend on the kick in the third menu option. So, to get the menu back up, we will press SELECT one more time, move over to the pitch bend menu, but instead of hitting B this time, I want you to hold A when that menu option is highlighted.
What this does is allows us to edit pitch bend values on all notes at once. We want the note to start high, then drop down to its current value quickly. The vertical value (the first rectangle) represents starting pitch, the second value is the speed at which it drops off (quick <-> slow).
To make a kick sound we will do something like this:

Onto the hi-hats. We are still in the menu screen, so press (down arrow) on the D-pad until you see **n** in the top left corner. We now have the noise channel selected. Here, we can put a hi-hat sound on the off beats by:
1. Selecting the note pitch, pressing B and placing notes on the third column.
2. Go back to the menu and play with the envelopes.
You’ll notice that the notes on the noise channel are polyphonic looking. That is to say, each note has four Cs on it. This channel is not polyphonic, but we can change the cut off of the low pass filter incrementally. To change each of these C values, we first have to press B on the note pitch menu, and then when you are highlighting an individual note, B+(arrow left/right) will allow you to select individual notes within that square, B+(arrow up/down) changes the value:

Right, finally on to the last part of this tutorial: the melody. And guess what, I’m going to leave this up to you based on the knowledge above. Essentially, you need to:
1. Go back into the menu
2. Press up until you are on the L or S channels
3. Choose the note pitch menu and go and place some notes
4. Mess around with filter cut off and note envelopes.
Once you have done that, let’s save these patterns!
Press SELECT to bring up the main menu. Then, press SELECT again to get to menu 2.
From here, we want to select the file menu, which is the far left menu. Once in the file menu you will be presented with 0 – F for each channel. To save a pattern, remember, we want to press B+(arrow down), or A+(arrow down) for all channels at once.
I was running the nanoloop demo ROM on my computer, so was unable to save, but you get the idea here:

And that pretty much covers all I wanted to do in this tutorial. There is much more to learn about this software, and I implore you to do so. As mentioned above, I have a few video tutorials that you can refer to, but nanoloop is all about experimentation!
Live Performance With nanoloop 2
Finally, I’d like to talk about how playing live for me is a real pleasure with nl2. Unlike LSDJj, there is a real performance element to using it. What do I mean by this?
Well, the way I (and most others as far as I can tell) play is by manually triggering patterns on the fly.
When I want to change the pattern playing on one of the four channels (or all at once) I go into the file menu, hit B+(arrow right), or A+(arrow right) for all four channels at once, and progress the track manually. Compare this to LSDj where the track generally plays from top to bottom all in one go.
Additionally, unless saving a pattern on the file menu screen, none of the changes that we make to the patterns are permanent. This allows performers to play with note release length, filter cutoff, LFO type, delay… Anything really, and then as soon as they reload the pattern or jump to the next pattern, all of those changes are reset on the fly.
This is a super powerful tool for creating buildups and crescendos before the inevitable drop comes in.
Check out this video of one of my performances as an example of what I mean. I play with note release length and increase the cutoff point of the low-pass filter before switching to the next pattern:
Thus, where LSDj live sets are generally like DJ mixes (mixing from one GB to the other), nl2 live performances have more of an improvisation feel to them.
Hope you enjoyed this guide and let’s get more people using this impressive piece of software!
nanoloop 2 is available for 49.00 € at the nanoloop site.
About The Author:
Joe E. Allen is a music journalist and founder of netlabel, Pterodactyl Squad. All the music on his label is made using video game sound chips or inspired by the sounds of games from years gone by, and it’s all free. Find them online at:
Allen previously authored How To Make 8-Bit Music: An Introduction To FamiTracker, An Interview with chiptune composer Alex Mauer and Making Music On A Game Boy With LSDj.

Great! I’ve never used it on the game boy but I love the iOS version with abandon. With all the normal nanoloop features plus a full screen touch UI (and an amazing set of UI gestures, once learned) plus solid MIDI Sync and ‘lo-if’ sampling, it’s a total champ.
Entire projects can be saved and emailed around. And projects load instantly which makes it very fun to hit play and then jump around inside of your collection of tunes.
Long live Nanoloop.
really cool! I honestely never thought one could do something this dancable with a gameboy, really good performance 🙂
While I like the idea of using a vintage handheld device to make music, the iOS version of nanoloop has double the channels and more capabilities. It’s one of the first music apps I ever bought and still gets plenty of use. Highly recommended.
Really hoping the iOS version doesn’t get the same channel reduction. I get how it could muddy the waters on the gameboy but with a touch interface, it’s very fluid. Some stuff like pattern chaining was a little simpler in the the pre 2.0 days though.
for people comparing between the iOS and the gameboy versions, yes the iOS definitely is more flexible and can easily import samples and do way more stuff than on a gameboy…. but for a lot of people (inculding me) the idea is to find a cool rom to create music with our handhelds rather that using a handheld to make the best music… youre always going to have more options with emulation of chip sounds or on apps made for better computers…. it’s mroe about the handheld being the end goal rather than the tool.
at least that’s how i see it.
this post has definitely reignited my interest in nanoloop… for years ive been using lsdj exclusively but ive started to really be held back by its lack of live manipulation and this is very intersting to me! i absolutely love the fact that you have a poly channel! that’s b’daas